Creating compelling landing pages, forms, and lead capture mechanisms using HubSpot is a fundamental aspect of inbound marketing. These tools help you capture valuable information about your website visitors, convert them into leads, and nurture them through the sales funnel. Here's a step-by-step guide to help you create effective landing pages, forms, and lead capture mechanisms using HubSpot:
1. Set Up Your HubSpot Account:
If you haven't already, sign up for a HubSpot account and log in.
2. Create a Landing Page:
In your HubSpot dashboard, navigate to Marketing > Website > Landing Pages.
Click on the "+ Create landing page" button.
Choose a template or start from scratch.
Customize your landing page content using the drag-and-drop editor. Ensure your content is clear, concise, and visually appealing.
Include a compelling headline, engaging copy, relevant images or videos, and a clear call-to-action (CTA).
-
- Navigate to your content:
- Website Pages: In your HubSpot account, navigate to Marketing > Website > Website Pages.
- Landing Pages: In your HubSpot account, navigate to Marketing > Landing Pages.
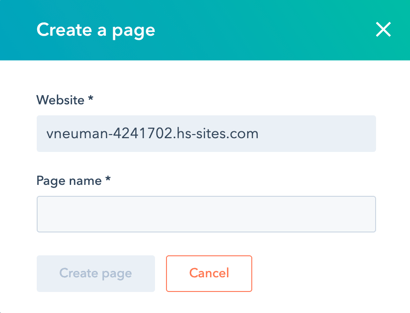
- In the upper right, click the Create dropdown menu and select Website page or Landing page.
- In the dialog box, specify a name and domain for the page:
- Click the Website dropdown menu and select a domain for the page's URL. If you don't have any connected domains, your account's default system domain will be the only option.
- In the Page Name field, enter an internal name for the page.
- Click Create page.
-
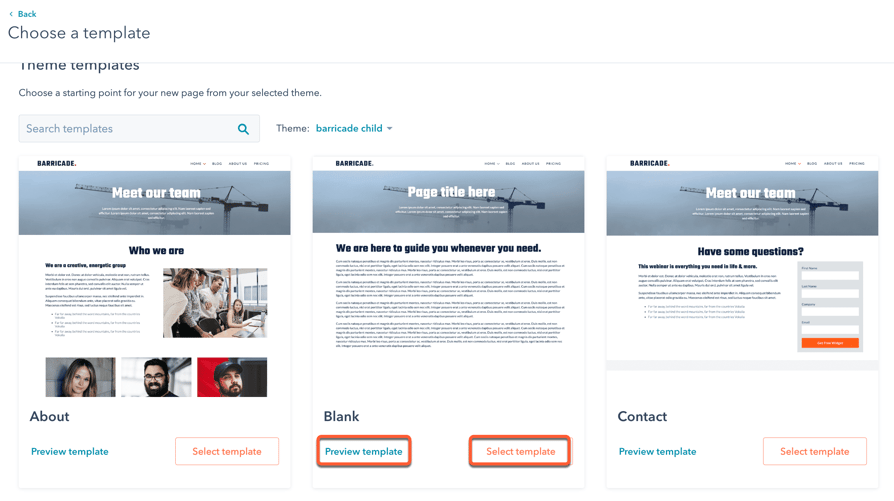
- On the template selection screen, templates from your active theme will appear at the top of the page, while all other templates will be in the Other templates section at the bottom. If you haven’t selected an active theme, hover over a theme and click Set as active theme.
- Hover over a template and click Preview template to open a preview or Select template to proceed to the content editor.
Customize page settings
Once you've edited your page content, you can customize page attributes like URL, meta description, and language.
Customize basic page settings
-
- Navigate to your content:
- Website Pages: In your HubSpot account, navigate to Marketing > Website > Website Pages.
- Landing Pages: In your HubSpot account, navigate to Marketing > Landing Pages.
- Hover over a page and click Edit.
-
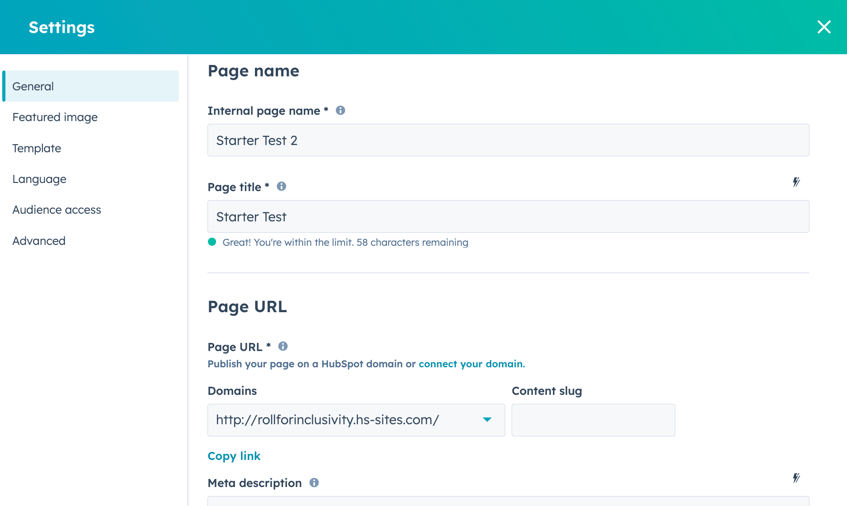
- Click the File menu and select Page settings.
- In the dialog box, enter an internal name in the Internal page name field. This name will not be visible to visitors.
- In the Page title field, enter an external name for the page. This name will appear in the tab at the top of a visitor's web browser when the page loads.
- In the Page URL section, click the Domains dropdown menu and select the domain where your page will be hosted. Then enter a URL slug in the Content slug field. Learn more about editing a page's URL.
- In the Meta description field, enter a description of the page's content that will appear in search results below the page title.
- To associate the page with a campaign, click the Campaign dropdown menu and select a campaign. To create a new campaign instead, select Add new.
Set the featured image
To add a featured image to be included when the page is shared on social media:
-
- Navigate to your content:
- Website Pages: In your HubSpot account, navigate to Marketing > Website > Website Pages.
- Landing Pages: In your HubSpot account, navigate to Marketing > Landing Pages.
- Hover over a page and click Edit.
-
- Click the File menu and select Page settings.
- In the dialog box, click Featured image in the left sidebar menu.
- Click to toggle the Enabled featured image switch on. Click Upload to select an image from your computer, or Browse images to select an image from the files tool. To increase accessibility, enter a description of your image in the Image alt text field.
Change the page template
-
- Navigate to your content:
- Website Pages: In your HubSpot account, navigate to Marketing > Website > Website Pages.
- Landing Pages: In your HubSpot account, navigate to Marketing > Landing Pages.
- Hover over a page and click Edit.
-
- Click the File menu and select Page settings.
- In the dialog box, click Template in the left sidebar menu.
- To select a different template, click Use different template. If you are switching the template of a published page, make sure to click Update, then Update now to take any unpublished changes live. Otherwise, these changes may be lost when you switch the template.
- On the theme selection screen, select a theme.
- On the template selection screen, select a template.
- Preview how your page will look with the new template, then click Use template to finish switching the template or Back to select a different template.
Set the page language
-
- Navigate to your content:
- Website Pages: In your HubSpot account, navigate to Marketing > Website > Website Pages.
- Landing Pages: In your HubSpot account, navigate to Marketing > Landing Pages.
- Hover over a page and click Edit.
-
- Click the File menu and select Page settings.
- In the dialog box, click Language in the left sidebar menu.
- Click the Page language dropdown menu and select a language. Learn more about managing multi-language pages.
Set page visibility
-
- Navigate to your content:
- Website Pages: In your HubSpot account, navigate to Marketing > Website > Website Pages.
- Landing Pages: In your HubSpot account, navigate to Marketing > Landing Pages.
- Hover over a page and click Edit.
- Click the File menu and select Page settings.
- In the dialog box, click Audience Access in the left sidebar menu
- Select an audience access option:
- Select Public to make the page's content available to any visitor.
- Select Private - Password required to add a required password for visitors to access the page content.
- In a CMS Hub Enterprise account, you can also select Private - Registration required to require visitors to register with your site to view this content.
- In a CMS Hub Enterprise or Marketing Hub Enterprise account, you can select Private - Single sign on (SSO) required to require visitors to sign in with an identity provider, such as Google or Okta.
Set advanced page options
-
- Navigate to your content:
- Website Pages: In your HubSpot account, navigate to Marketing > Website > Website Pages.
- Landing Pages: In your HubSpot account, navigate to Marketing > Landing Pages.
- Hover over a page and click Edit.
-
- Click the File menu and select Page settings.
- In the dialog box, click Advanced in the left sidebar menu.
- To make this page a dynamic page, click the Data source dropdown menu and select a HubDB table or property. Learn more about working with dynamic pages.
- To add code snippets to the head or footer HTML of the page, click the Head HTML or Footer HTML field, then enter your code snippet. To add code snippets to all pages on a domain instead, access your website settings.
- To add a custom canonical URL, enter the URL in the Customize canonical URL field. Learn more about using canonical URLs.
- To manage the different types of stylesheets attached to the page:
- Domain Stylesheets: these stylesheets are attached to all pages on a single domain in your website settings. To turn off domain stylesheets for a particular page, click the dropdown menu and select Disabled. Learn more about working with domain stylesheets.
- Template Stylesheets: these stylesheets are set by the page's template. To turn off template stylesheets for a particular page, click the dropdown menu and select Disabled. This section won't appear for pages using theme templates.
- Page Stylesheets: these stylesheets will only apply to this page. To attach a page stylesheet, click the Attach a stylesheet dropdown menu and select a stylesheet. If domain and template stylesheets are also used, their styling will take precedence.
Publish pages
Once you've customized your page's content and settings, you can publish your page or schedule it for future publication:
-
- Navigate to your content:
- Website Pages: In your HubSpot account, navigate to Marketing > Website > Website Pages.
- Landing Pages: In your HubSpot account, navigate to Marketing > Landing Pages.
- Hover over a page and click Edit.
- To publish the page immediately:
- Click Publish in the top right.
- In the dialog box, click Publish now.
- To schedule a page for later publishing:
- In the top right, click the dropdown menu next to the Publish button, then select Publishing options.
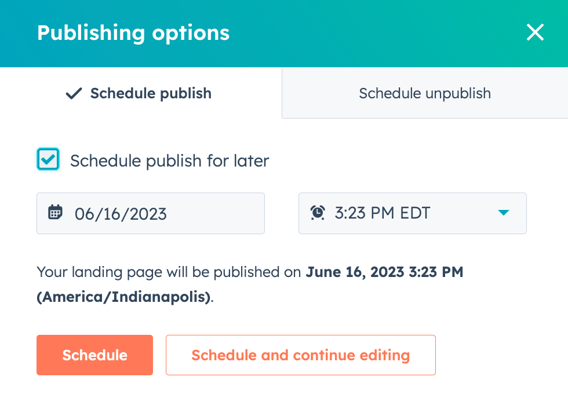
- In the dialog box, select the Schedule publish for later checkbox.
-
-
- Click the date field and select the date when your page will be published.
- Click the time dropdown menu and select the time when your page will be published.
-
-
- Click Schedule, or click Schedule and continue editing to schedule the page's publication and return to the content editor.
-
- To set your page to be unpublished automatically in the future:
- In the top right, click the dropdown menu next to the Publish button, then select Publishing options.
-
-
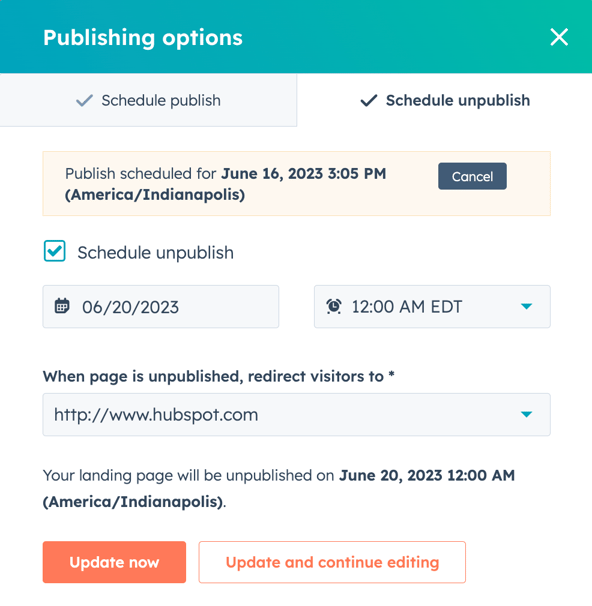
- In the dialog box, click the Schedule unpublish tab.
- Select the Schedule unpublish checkbox.
- Click the date field and select the date when your page will be unpublished.
- Click the time dropdown menu and select the time when your page will be unpublished.
- Click the When page is published, redirect visitors to dropdown menu select a page. To use an external destination URL, click the dropdown menu and select Enter an external URL. In the dialog box, enter the URL, then click Save.
- Click Update now, or click Update and continue editing to schedule the page's unpublication and return to the content editor.
Optimize pages for search engines
In the Optimize section of the sidebar editor, you can view a page's SEO recommendations or attach it to a topic.
-
- Navigate to your content:
- Website Pages: In your HubSpot account, navigate to Marketing > Website > Website Pages.
- Landing Pages: In your HubSpot account, navigate to Marketing > Landing Pages.
- Hover over the page and click Edit.
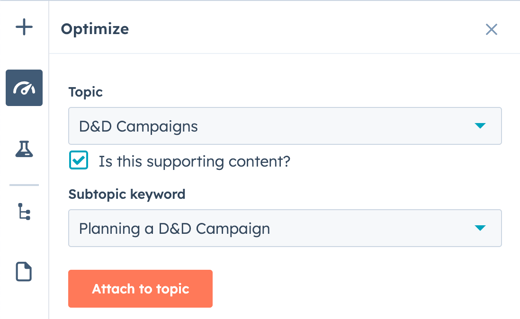
- In the content editor, click the gauge Optimize icon in the left sidebar.
- To attach the content to a topic:
- To add an existing topic, click the Topic dropdown menu and select a topic for your page.
- To create a new topic, click the Topic dropdown menu and select Add core topic. In the dialog box, enter the topic, then click Save
- To attach the page to a subtopic keyword:
- Select the Is this supporting content? checkbox.
- Click the Subtopic keyword dropdown menu and select a subtopic keyword
- To create a new keyword, click the Subtopic keyword dropdown menu and click Add subtopic keyword. In the dialog box, enter the subtopic keyword, then click Save.
-
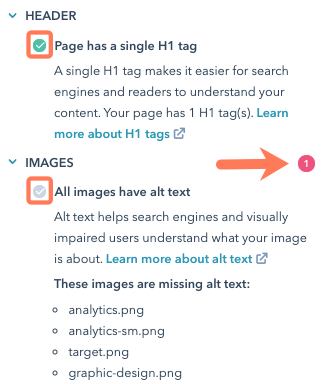
- To view incomplete SEO recommendations, click a category with a red circle. Each completed recommendation will have a green checkmark. Each incomplete recommendation will have a grey checkmark. Learn more about working with SEO recommendations.
Preview pages
Before publishing a page, you can preview it on different device types and test smart content and personalization. Learn more about customizing a page's appearance for mobile devices.
-
- Navigate to your content:
- Website Pages: In your HubSpot account, navigate to Marketing > Website > Website Pages.
- Landing Pages: In your HubSpot account, navigate to Marketing > Landing Pages.
- Hover over the page and click Edit.
- In the content editor, click Preview in the top right.
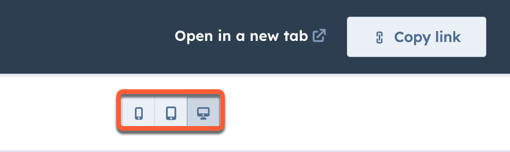
- To access a full page preview, click Open in new tab in the top right. To share this preview page with other users in your HubSpot account, click Copy link on the preview page. Users must be logged into HubSpot to view this preview.
- To preview the page on a different device, click a mobile device icon in the upper right of the preview page.
-
- To preview personalization or smart content, click the Preview as dropdown menu:
- Select Contact to preview the page's personalization. Then click the second dropdown menu and select a contact to preview how the page would appear for that contact.
- Select Smart rule to preview the page's smart content. Then click the second dropdown menu and select one or more smart rules to preview how the page would appear for a visitor matching those rules.
- To return to the page's default appearance, click Reset.
3. Optimize for Mobile:
HubSpot templates are typically responsive, but make sure your landing page looks great on both desktop and mobile devices.
One of the great things about inbound marketing is that your content keeps paying dividends over time, long after it was originally promoted.
"Often, here at HubSpot, we discover that as much as 90% of the new leads we generate each month actually converted on offers we didn't create or actively promote that month. Furthermore, up to 70% of new leads have come from offers we hadn't touched in over three months.
That's a pretty nice spot to be in, don't you think?What if the campaigns you're working on this month were still generating leads for you six months later? What about three years later?"
"Use HubSpot's AI Campaign Assistant to Create Landing Page .
Similar to the offers we create, we here at HubSpot have also found that more than 65% of the leads we generate from our blog each month come from older articles that weren't published in the last six months.In other words, old content and offers you've created months -- even years -- ago has a huge potential to continue generating new leads now and in the future.
People are looking for answers to their problems, and they are finding our content. And for us, having web pages that rank well for these terms generates thousands of new leads for us each and every month, without any additional effort on our part.
That's why it's so critically important to keep SEO best practices in mind whenever you're creating a new piece of content or offer. Because doing the right things now will pay dividends long into the future.Below are eight tips to optimizing your landing pages for organic traffic and lead generation.
Landing Page SEO Best Practices
- Create a short but keyword-optimized page title.
- Structure your landing page URL correctly.
- Create a heading tag that matches the page title.
- Write a clear and direct meta description.
- Optimize the title. (wait, what?)Use structured data to qualify for rich snippets.
- Be careful with how many form fields you have.
- Have a link-building strategy.
1. Create a short but keyword-optimized page title.
The most important element for any on-page SEO is the title of the page, according to data from Moz. The page title is the description of the webpage that shows up at the top of your browser (or in the tabs if you have more than one open in your browser window):
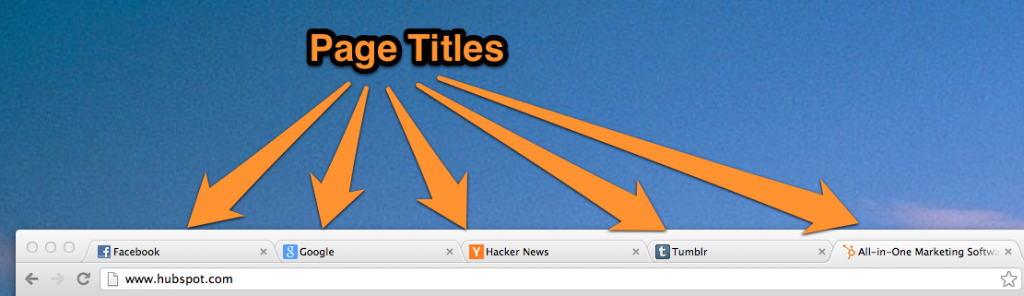
Page titles are one of the most effective ways to indicate what the content on a given page is to search engines, and they're also a key component to consider when following SEO best practices. Specifically, follow these rules when creating page titles for your landing pages:
Keep it short.
Search engines generally only show the first 60 characters in search results, and your page title doesn't need to be the full title of the content or offer you're promoting. Instead, focus on keywords by removing any unnecessary words. Just be sure it's also still easy to read and clear to a human what the content of the page is all about.
Include high-quality keywords first.
Search engines place more emphasis on keywords that appear closer to the left of the page title. Because this is the case, you should start your page title with your most important keywords first, and include your less important ones later.
Use vertical pipes to separate concepts and phrases.
This is a good best practice since it helps search engines break apart multi-word phrases and figure out which keywords go together. For example, you'll notice that we use a vertical pipe in the page title of this blog ("Internet Marketing Blog | HubSpot").
Don't include your company's name in every single page title.
You should aim to optimize your landing pages for long-tail search visitors who are simply seeking information on a topic and haven't necessarily heard of your company. Don't worry, even if you leave out your company's name, you can still rank well for branded searches because of your root domain name and the rest of the page authority your site has built up. There's no need to waste valuable SEO real estate on things you'll already rank for.
2. Structure your landing page URL correctly.
The URL of our landing page is its next-most important on-page SEO element. Your URL helps communicate even more information to search engines about the content on the page. Furthermore, URLs also convey site structure and how this page fits among the other content on your site.
The rules for landing page URLs are actually similar to page titles:
Keep it short.
Most search engines only show about 65 characters in the URL portion, and some of these will be taken up by your domain name (e.g. http://www.hubspot.com...), leaving you with only a few dozen characters to work with if you don't want your URLs truncated in search results.
Use slashes to separate concepts and phrases.
Ideally, each level of depth in your URL has its own page that visitors can check out. So, for example, if you're promoting an offer about generating leads through social media in 2020, your URL for the landing page might be:
/lead-generation/social-media/2020-predictions/
According to the above URL, you'd also have a page on generating leads through social media at the following URL:
/lead-generation/social-media/
Then, the most more general page you have published on lead generation is at this URL:
/lead-generation/
The examples above show how you can "nest" your landing page inside more general webpages from which you can navigate to your landing page. In web development, the paths of text between each forward slack are known as subdirectories, or subfolders, and they help search engines understand how your content is organized.
Information architecture is a key part of landing page SEO. Making sure your landing pages -- and all the rest of the content on your site -- are well organized helps both search engines and humans find the content they're looking for, at the level of depth and specificity they expect.
Put more important keywords closer to the left.
Just like with page titles, keywords that appear earlier in a URL are given more weight than ones that appear later. This follows from the last point about nesting concepts in your URL. If someone is searching for "lead generation," you want to make sure they find your /lead-generation/ page and not necessarily one of the other, more specific pages.
3.Create a heading tag that matches the page title.
There should always be a single "H1" heading tag on your landing page. It should succinctly describe your offer and explain what the page is about. But be forewarned: Don't try to stuff your keyword into this page element -- Google is wise to it.
In fact, a keyword for a headline, with no other context, can confuse your visitors and cause them to bounce back to the search engine result page. When a search engine detects that people clicked on your website, but then came back to the search results and clicked on another result, the search engine takes that as a sign that your content probably didn't answer their question, and thus, doesn't deserve to rank for that term.
That's why it's important to make sure search engine visitors can figure out exactly what you're offering on your landing page very quickly, before they lose interest and bounce back. A good way to ensure readers stick around on your landing page -- something that can increase your ranking over time -- is to make your H1 heading as similar (if not identical) to the page title as possible.
You should also consider using a subheading, graphics, and bulleted lists to help visitors understand your offer quickly and keep them engaged with your content.
4.Write a clear and direct meta description.
The content of a webpage's meta description is not a direct ranking factor for Google, but what you put here can greatly influence a person's willingness to click on your search result. And the more people who click through to your content, the more likely search engines are to take that as a signal to rank you higher.
So, write a meta description for your landing page, and make it snappy.We use the word "snappy" on purpose, here. Landing pages have much greater lead-generation potential than blog posts and other educational content. This means people who are looking for landing pages can be much more skittish when reading a result's meta description. If this description isn't quick, snappy, and to the point, they'll move on.
When writing a meta description, tell your readers what they'll receive. Are you promoting an event? Tell them they'll be able to register as an attendee. Are you offering an ebook? Tell people what's inside that ebook.

5.Optimize the title. (wait, what?)Use structured data to qualify for rich snippets.
Visual content is much harder for search engines to scan and understand, but that doesn't mean you can't use images to help your page rank for certain keywords.
Plus, many topics common to landing pages are highly searched for in image form. For example, If the landing page is promoting an event, for which you want people to register, consider the fact that many people might be searching for snapshots of this event -- and therefore their search is taking place in Google Images.
How do you get Google to find these images? Well, because it's so difficult for search engines to "read" visual content on a webpage, many search engines take clues about what an image contains from its file name and the alt text you provide.
The file name should be short and include words separated by dashes. The alt text should describe either the content of the image, or the content the image is illustrating. Alt text is used by screen readers and is displayed when an image fails to load, so it should clearly describe the images on your page so viewers know what they're missing. For example, if we included an image of the sales and marketing funnel on a landing page for an offer about sales and marketing alignment, the file name might be sales-marketing-funnel.jpg, and the alt text might be "sales and marketing funnel."
An image's alt text and file name can also be great places to include synonyms or variations of your keywords (as long as they appropriately describe the image). They're not content that visitors usually see, but they can still help you rank for permutations and variations of your targeted phrases.
6.Be careful with how many form fields you have.
Rich snippets enhance search engine result listings, like the ones pictured below. They give searchers more information about your content -- such as authors, music, reviews, events, products, etc. -- making your page stand out from the other pages provided in search results, and thus, garnering you more search traffic.
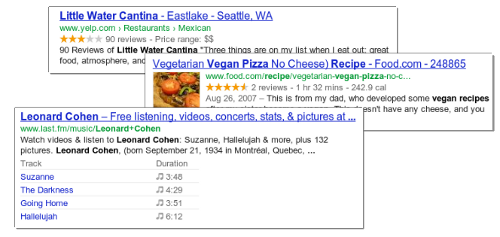
To see if your page qualifies for rich snippets, run it through Google's free structured data testing tool. The tool will automatically scan your page and generate a preview of what it could look like in search results. What this tool is looking for is specific markup in the HTML of the page that helps search engines identify the content of a given page, like an image, a video thumbnail, a star rating, or a price. The type of rich snippet generated depends entirely on the content of the page. For example, a listing for an ecommerce site might have the product's price, category, and 5-star rating, while a listing for a video streaming service might display a video thumbnail and the length of the video.
7.Have a link-building strategy.
Remember when we talked about the concept of bounce rate in tip #3, earlier in this blog post? A high bounce rate indicates that your readers are "bouncing" from the webpage at a high frequency, and this can drop your ranking on search engines over time. Well, here's another tip to prevent people from leaving your landing page too soon.
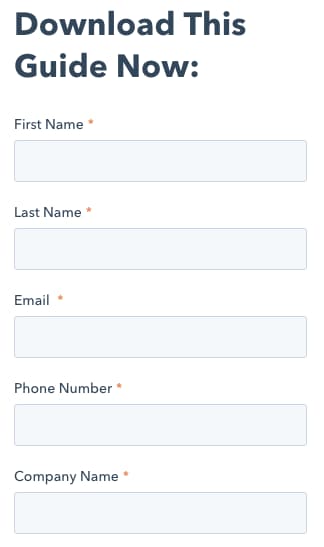
Landing pages typically have forms for readers to fill out with their contact information in exchange for an asset -- like an ebook, an event ticket, or a lottery entry. However, keep in mind forms aren't the most beloved part of a buyer's journey, and a form that asks for too many things can scare your readers off.
If your landing page has a form, minimize the type of contact information you're asking of your readers. If you find yourself with a form longer than the one below, examine the page's organic traffic and bounce rate, and consider if you're asking for too much of potential leads.
4. Add Forms:
To capture leads, you'll need a form on your landing page.
Drag and drop the "Form" element onto your landing page where you want the form to appear.
Customize the form fields to collect the information you need from your leads (e.g., name, email, company, etc.).
Set up form properties, such as form submission notifications and redirecting users to a thank-you page.
5. Configure Form Actions:
Specify what should happen when a visitor submits the form. This can include sending a follow-up email or adding the lead to a workflow.
To set up your form’s automation:
- In your HubSpot account, navigate to Marketing > Lead Capture > Forms.
- Click the name of an existing form, and click Edit to add follow-up emails, or create a new form.
- In the forms editor, click the Automation tab.
Create a simple workflow
Set up a simple workflow from the form editor to automate follow-up actions such as sending an email or creating a task. When creating a simple workflow:
- By default, the simple workflow's enrollment trigger will be set to the form submission. This enrollment trigger cannot be changed.
- Contacts are enrolled in the simple workflow each time the form is submitted, even if they have enrolled before.
To create a simple workflow:
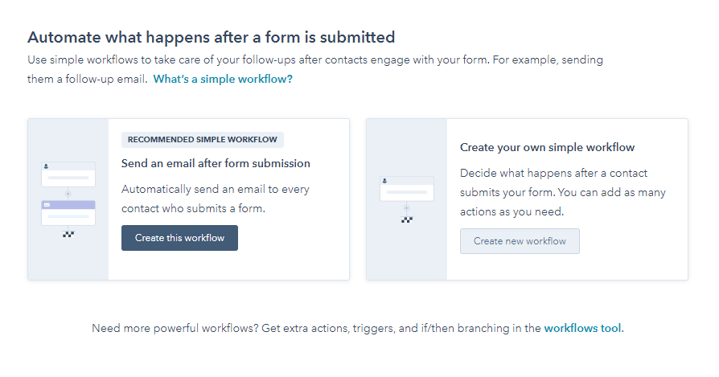
- In the Automate what happens after a form is submitted section:
- To automatically trigger a follow-up email after each form submission, under Send an email after form submission, click Create this workflow.
- To create your own workflow from a blank template, under Create your own simple workflow, click Create new workflow. In the right slide-in panel, under Trigger the action(s) when, select the option A contact submitted a form.
- To add other workflow actions, click the + plus icon.
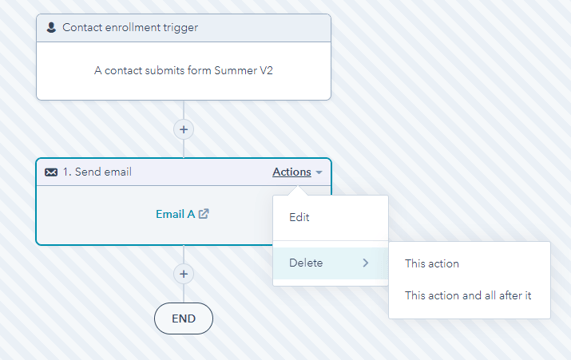
- To edit an action, on the workflow action, click Actions > Edit.
- To delete workflow actions, on the workflow action, click Actions > Delete. You can select This action to delete only the selected action, or select This action and all after it to delete the selected action and all following actions.
-
- To leave a note on a workflow action for you or your team's reference, hover over the action and click the comments comments icon. Learn how to add comments to workflow actions.
- To change a workflow’s name, at the workflow header, click the edit pencil icon.
- To delete a workflow, at the workflow header, click Actions > Delete workflow.
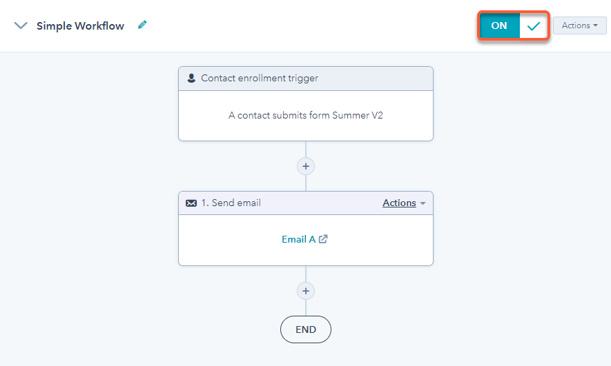
- To turn on a workflow, next to the workflow name, click to toggle the switch on. Then, click Got it. After publishing your simple workflow, any changes made to the workflow will automatically apply to currently enrolled contacts.
6. Implement Smart Fields:
Use HubSpot's smart fields feature to prevent returning visitors from seeing the same form fields again. Instead, show them new questions to gather more information gradually.
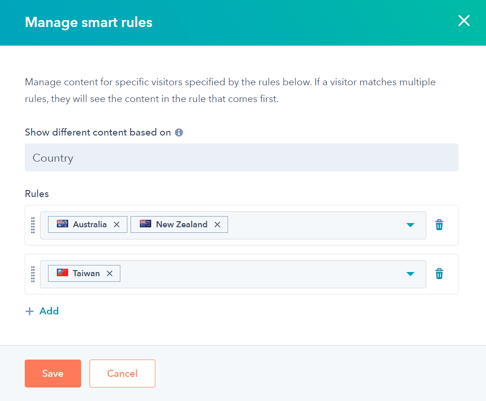
Use smart forms to customize the form displayed depending on your website visitor. For example, you can display different forms or form options depending on what country a visitor is from or what lifecycle stage they're at.
Smart forms cannot be used with pages created from starter templates, learn more about using smart content and smart content rules.
You can use the following criteria for your smart rules:
- Country: display content to your viewer based on their country. The country is determined by the IP address of the visitor.
- Device type: specify which device this smart content is centered around, such as mobile, tablet, or desktop. HubSpot refers to the user agent of your visitor’s browser to determine their device type. Since this can sometimes be changed on the device, accurate segmentation cannot always be guaranteed.
- Referral source: show visitors your smart content based on how they found your site.
- Preferred language: personalize your content based on the language set within the user's web browser.
- Contact list membership: show contacts in your HubSpot database certain content depending on whether or not they're a member of one of your HubSpot lists.
- Lifecycle stage: this will look at the lifecycle stage property of a contact in your HubSpot database and display the relevant content based on the value of this field.
- After editing your smart form, in the upper right, click Publish.
Create a smart form in your template
In addition to creating a smart form directly on the page, you can also add a smart form to your
HubSpot template. To create a smart form in your template:
- In your HubSpot account, navigate to Marketing > Files and Templates > Design Tools.
- In your design manager, click the name of the template.
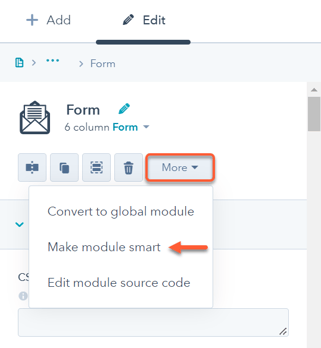
- Click the form module or add a new form module.
- In the right panel, click the More dropdown menu and select Make module smart.
- In the dialog box, select the criteria you want to base your smart content rules on.
- Click Create.
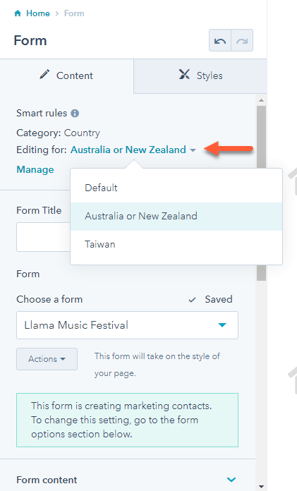
- To edit the default form displayed or form options for each smart rule, in the Default content section, click the Editing for dropdown menu and select a smart rule.
- To add another rule or manage your rules, click Manage.
- After making your changes, in the upper right, click Publish changes

7. Set Up Progressive Profiling:
Gradually collect more information from leads over time. HubSpot allows you to implement progressive profiling, which shows different form fields each time a lead revisits your site.
Progressive fields allow you to make your forms smarter and more efficient. With standard form fields, the same fields will appear each time the form is loaded. However, if the contact filling out your form already has a value for a specific field, you can use progressive fields to set another field to appear in its place.
Over time, you can learn more about your leads without asking them the same questions or asking for too much information prior to building trust.
Before you get started
Before using progressive fields, please note the following:
- Progressive fields can only be used with regular forms, they cannot be used with pop-up forms.
- If the Always create contacts for new email address option is turned on, you cannot use progressive fields.
- If the Pre-populate fields with known values option is turned on and the property value is known, the queued progressive field will appear for progressive form fields. Pre-populated fields will only appear for non-progressive form fields.
- For a progressive field to display, the contact must currently not have a value for the field and must not have had a value for the field in the past.
- It is not recommended to make the Email field progressive. Including an email field on every form allows contacts to update their email with a preferred address, creates a more consistent user experience, and prevents contact deduplication.
Add progressive fields
To add progressive fields to a form, you’ll first choose which fields to queue up, and then select existing fields to make progressive:
- In your HubSpot account, navigate to Marketing > Lead Capture > Forms.
- Click the name of a form or create a new form.
- In the form editor, on the right panel, click Queued progressive fields.
- Click and drag over any fields you want to show in place of a contact's previously captured fields. Queued fields will appear in this order if a contact has known values for any of your progressive form fields.
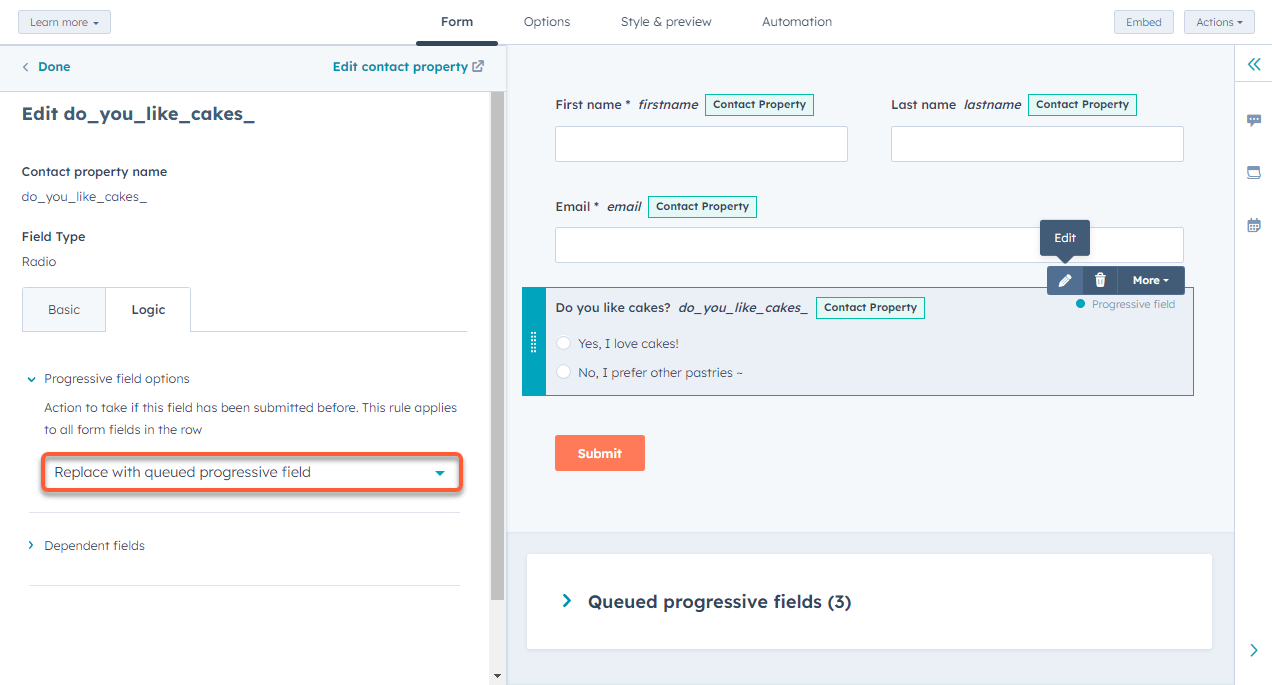
- To set an existing field as a progressive field, hover over the field and click the editpencil icon.
- In the left panel, click the Logic tab.
- Then, click Progressive field options.
- Click the dropdown menu and select Replace with queued progressive field. If this field has been previously submitted, the field will be replaced with the next queued progressive field.
Please note: if there are multiple fields in a row on the form, the progressive field option will apply to all fields in the row.
Test progressive fields
You can test your progressive fields with specific contacts, to test your progressive fields:
- Click the Style & Preview tab.
- In the left panel, scroll down and click the Test section.
- Select a Queued progressive field checkbox to see how the form changes for a visitor who has already filled it in or already has a value for the field.
- In the upper right, Save or Publish your changes.
8. Add Social Sharing Buttons:
Encourage visitors to share your landing page on social media by adding social sharing buttons.
9. A/B Testing:
Create variations of your landing page and test different elements like headlines, CTA buttons, and images to determine which version performs better.
10. SEO Optimization:
Optimize your landing page for search engines by adding relevant keywords to the title, meta description, and content.
11. Publish Your Landing Page:
Once your landing page is ready, click the "Publish" button to make it live.
12. Monitor Performance:
Track the performance of your landing page using HubSpot's analytics tools. Monitor conversion rates, page views, and other relevant metrics.
13. Continuously Optimize:
Regularly review and refine your landing pages based on performance data. Test different elements to improve conversion rates.
14. Lead Nurturing:
- Lead nurturing in HubSpot involves a series of steps designed to cultivate relationships with potential customers and guide them through the sales funnel. Here are the steps to lead nurturing in HubSpot:
- Define Your Target Audience: Identify your ideal customer personas, including their demographics, pain points, and preferences. Understanding your audience helps you create relevant content and messaging.
- Segment Your Leads: Organize your leads into different segments based on their characteristics or behaviors. HubSpot allows you to create smart lists and segments to group leads effectively.
- Create Valuable Content: Develop content that addresses the needs and interests of your leads at various stages of the buyer's journey. This can include blog posts, ebooks, webinars, and more.
- Set Up Lead Scoring: Use HubSpot's lead scoring feature to assign scores to leads based on their engagement with your content and interactions with your website. This helps prioritize leads for further nurturing.
- Build Email Workflows: Create automated email workflows that send relevant content to leads based on their behavior and interests. These workflows can include welcome emails, educational content, and promotional offers.
- Personalize Messaging: Use personalization tokens in your emails and other communications to address leads by their first name and tailor content to their specific interests and needs.
- Monitor Lead Activity: Keep a close eye on lead interactions with your emails, website, and content. HubSpot's tracking tools provide valuable insights into lead behavior.
- Lead Scoring Adjustments: Regularly review and adjust your lead scoring criteria to ensure that high-potential leads are being prioritized for more personalized outreach.
- Engage in Multi-Channel Communication: Utilize various communication channels such as email, social media, chat, and even SMS to connect with your leads where they prefer to engage.
- Provide Educational Content: Share informative and educational content that helps leads address their challenges and make informed decisions. Showcase your expertise in your industry.
- A/B Testing: Continuously test different email subject lines, content formats, and send times to optimize your email campaigns for better engagement.
- Lead Qualification: Use HubSpot's lead scoring and qualification features to identify when a lead is sales-ready and should be passed on to the sales team for further engagement.
- Sales Handoff: Ensure a smooth transition of qualified leads to your sales team. Provide them with all the necessary information and context to continue the conversation effectively.
- Feedback Loop: Maintain open communication between your marketing and sales teams. Gather feedback on lead quality and conversion rates to make continuous improvements.
- Measure and Analyze Results: Regularly review HubSpot's analytics and reporting tools to assess the effectiveness of your lead nurturing efforts. Adjust your strategies based on the data to improve results.
- Optimize and Iterate: Use the insights from your analytics to refine your lead nurturing campaigns continually. Test new approaches and content to keep improving your conversion rates.
Remember that lead nurturing is an ongoing process that requires patience and consistency. HubSpot's automation tools can help streamline many of these steps, making it easier to nurture leads effectively and efficiently.
HubSpot provides a user-friendly platform for creating and optimizing landing pages, forms, and lead capture mechanisms. Consistently monitor your campaigns and adapt your strategies to improve results over time.